Upgrading to Angular2 RC1
The “Daj się poznać” contest is coming to an end and I have learned a lot and experimented with many things. I created a couple of sample projects but my main project was a bit neglected. It’s about time to speed up the development of my contest application.
Since I’ve started working on that app, a lot changed. The biggest change was the new version of Angular2 which at the time of writing this post, is called: RC1. I started my development with an upgrade to this version.
The process of upgrading went rather smoothly but only because I had very few components. The upgrade involved the renaming of namespaces so if you have a lot of components this renaming could be very cumbersome.
The second biggest change in Angular RC1 was router. The previous router became deprecated and was renamed to @angular/router-deprecated and the new router named @angular/router wasn’t documented on the official page of Angular2 at the time of writing this post.
Anyway, I decided to continue my development process and I created a couple of Angular2 components. First, what I did was to get rid of dependency @angular/router-deprecated from package.json and from node_modules. All decorators, directives and services related to new routing are inside the namespace @angular/router.
In Angular2 RC1, the configuration of routes is done by the decorator @Routes, previously it was the @RouteConfig decorator. Both decorators take array as their argument but now the type of array items are different. Previously, it was array of RouteDefinition with the definition being:
interface RouteDefinition {
   path?: string;
   aux?: string;
   component?: Type | ComponentDefinition;
   loader?: Function;
   redirectTo?: any[];
   as?: string;
   name?: string;
   data?: any;
   useAsDefault?: boolean;
}
Currently, it is an array of RouteMetadata with the definition being:
abstract class RouteMetadata {
   path: string;
   component: Type;
}
It means that now to create a route, you must only specify the path and the type of component. For example like this:
@Routes([
   {path: '/main-page', component: MainPageComponent},
   {path: '/dashboard/...', component: DashboardComponent}
])
Firstly, what hit me at this stage was how to now specify the default route. I searched for a bit how to do this, but everything I found then was simply calling this._router.navigate(['/main-page']) inside ngOnInit of your main component. Then, I found that to make a route default you must specify its path with alone slash (/) as you can see in this snippet of code:
@Component({
 moduleId: module.id,
 selector: 'sample-app-app',
 templateUrl: 'sample-app.component.html',
 styleUrls: ['sample-app.component.css'],
 directives: [ROUTER_DIRECTIVES],
 providers: [ROUTER_PROVIDERS]
})
@Routes([
 {path: '/dashboard', component: DashboardComponent},
 {path: '/', component: MainPageComponent}
])
export class SampleAppAppComponent implements OnInit {
 title = 'sample-app works!';

 constructor(private router:Router) {
 }

 ngOnInit() {
 }
}
In order to have this routing working, you must put <router-outlet></router-outlet> inside your template. This is the same as it used to be, but now this directive comes from a different module.
To configure nested routes you don’t use … as before, you simply specify part of your route and the component related to it. Then inside your component you must specify further route configurations. In my case, I used DashboardComponent and it looked like this:
@Component({
 moduleId: module.id,
 selector: 'app-dashboard',
 templateUrl: 'dashboard.component.html',
 styleUrls: ['dashboard.component.css'],
 directives: [ROUTER_DIRECTIVES]
})
@Routes([
 {path: '/event-list', component: EventListComponent},
 {path: '/event-details', component: EventDetailsComponent}
])
export class DashboardComponent implements OnInit {

 constructor() {}

 ngOnInit() {
 }
}
You can see the rest of files for my solution in this repository.
When you look at this repository, you may wonder why I prefixed the folder with a + sign. It is required in order to have lazy loading of components. You can watch a talk given by Misko Hevery at ng-conf 2016 to find out a bit more about it.
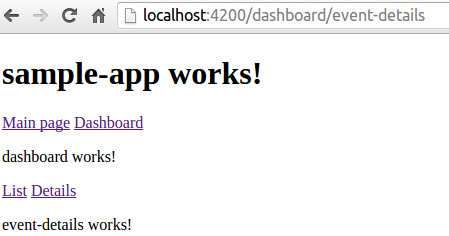
The final result of this example looked like this in the browser.

The interesting part of the new router is that you can specify links in templates relative to the component where they are placed. You can see an example of this here:
<a [routerLink]="['./event-list']">List</a>
<a [routerLink]="['./event-details']">Details</a>
This is a fragment of a dashboard.component.html file. You can see that the links are specified relative to the DashboardComponent. Everything I’ve written up to now the result of searching and experimenting after Angular2 RC1 one was released. I mentioned that when I wrote this post there wasn’t official documentation for the new router which was introduced in this version. It’s quite probable that what I have stated in this post may be wrong but until there is an official reference to deal with the new router, my solution is sufficient for me and fortunately it works quite well.
Related posts:
- Enrolling in "Daj się poznać"
- "Daj się poznać" - Project details"
- I'm holding a Project Rider EAP
- Installing ASP .NET Core 1 on Ubuntu 14.04
- My first ASP NET Core 1.0 web application
- Project setup - server-side
- Project setup - client-side
- Adding styling to my application
- Angular 2 Confirm Dialog Component
- Before going into production
- Publishing to Azure
- Setting up the Web client for Google Identity Platform
- oidc-token-manager library with Google Identity Platform - Part 1
- oidc-token-manager library with Google Identity Platform - Part 2
- Accessing API with token from Google Identity Provider
- How portable is ASP .NET Core 1.0?
- When dotPeek can save your live
- Reading code as if it were a book
- ASP .NET Core Configuration
- Getting started with IdentityServer4
- IdentityServer4 - accessing API
- Dealing with secrets in ASP .NET Core
- Google Identity Provider with IdentityServer4
- Upgrading to Angular2 RC1
- Experimenting with Angular2 CLI
- Migrating to ASP .NET Core RC2
- Epilogue: Daj się poznać series

Comments
comments powered by Disqus