Project setup - client-side
It’s not an easy task these days to set up a client-side application. There is now an explosion of technologies. You should know all these: npm, Node.js, Grunt, Gulp, Bower, Babel, ES2015, TypeScript, Less, Sass, Bootstrap, etc. Yes, of course there are seeds which allow a startup project to be ready to run but almost every one of them gives you something more than you need and when you use this kind of seed you may not know what’s really going on in the building process of your application. The client-side part of my application will be based on Angular 2. I decided to set up the Angular 2 application from scratch in order to feel by myself what this process looks like, I’ll describe the process and what I’ve learned in this post.
I think the best place to start with something new is on its official page and so I did this with the setup of the Angular 2 application. On this page I found all the necessary information needed to run my first Angular 2 component on a startup page of my application, but I must also adjust what’s on this official page to the ASP .NET Core reality.
5 Min Quickstart on the Angular 2 official page gave a ready to use scaffolding for my application. What I need to be aware of is that in ASP .NET Core, the root folder of my site is wwwroot and all static files should go into this folder. I inserted app.component.ts and main.ts to the wwwroot folder. I changed the content of app.component.ts a bit so it looked like this:
import {Component} from 'angular2/core';
@Component({
    selector: 'notifier',
    template: '<h1>{{title}}</h1>'
})
export class AppComponent {
    title = "Notifier!!!"
}
Other files such as: package.json, tsconfig.json and typing.json, I put under the root of my project. I did a couple of changes in project.json so it is listed below:
{
  "name": "Notifier",
  "version": "1.0.0",
  "scripts": {
    "tsc": "tsc -w",
    "typings": "typings",
    "postinstall": "typings install"
  },
  "license": "ISC",
  "dependencies": {
    "angular2": "2.0.0-beta.9",
    "systemjs": "0.19.24",
    "es6-promise": "^3.0.2",
    "es6-shim": "^0.33.3",
    "reflect-metadata": "0.1.2",
    "rxjs": "5.0.0-beta.2",
    "zone.js": "0.5.15"
  },
  "devDependencies": {
    "del": "^2.0.2",
    "gulp": "^3.9.0",
    "typescript": "^1.8.7",
    "typings":"^0.7.5"
  }
}
I left “dependencies” untouched but I changed “devDependencies” quite a lot. I don’t need live reload, so I removed this and I also added del and gulp which allowed me to do some processing on application files. The most interesting things are in the “scripts” part of the package.json file. I left only three commands and two of them were unchanged, these are typings and postinstall. These commands download typings for TypeScript to the root of your project right after your npm install command finishes their work. After this there’ll be a folder named typings in the root of the project. It’s wise to add this folder to .gitignore. The command typings in this configuration works in the root of your project. That’s why typings.json is in this location and not in wwwroot. This file is a typings command configuration and it persists dependencies so that everyone on the project can replicate it and that’s why you don’t need to commit typings folder.
Another command I changed a bit was tsc, so when I run it my
TypeScript files will be watching for changes and compiled right after these changes happened.
This command looks for config in the location where it works.
It is the root of the project so again that’s why tsconfig.json stays in
this place and not in the wwwroot. This command creates .js files and .map
files just next to the original .ts files, it is also a good practice to ignore
these .js and .map files in version control system. To do this I inserted these two lines to .gitignore
src/web/wwwroot/app/**/*.js
src/web/wwwroot/app/**/*.map
The next step was executing in terminal command npm install.
Doing this allowed me to fetch all dependencies which are specified in package.json.
I put my package.json in the root of project so when I executed npm install the node_modules folder was located in this location. We know that only the wwwroot folder is visible from the outside world. I needed a way to move files from node_modules to the location somewhere inside wwwroot. I used task runner gulp to move these files to the lib folder inside the wwwroot. You may have noticed that I added a bunch of modules inside “devDependencies” in package.json, these are needed for copying desired files to wwwroot.
I added gulpfile.js into the root of project and inside this file I added some gulp tasks so it looks like this:
"use strict";

var path = require('path');
var gulp = require('gulp');
var del = require('del');

var webroot = "./wwwroot/";

var config = {
    libBase: 'node_modules',
    lib: [
        require.resolve('es6-shim/es6-shim.min.js'),
        require.resolve('es6-shim/es6-shim.map'),
        require.resolve('systemjs/dist/system-polyfills.js'),
        require.resolve('systemjs/dist/system-polyfills.js.map'),
        require.resolve('angular2/es6/dev/src/testing/shims_for_IE.js'),
        require.resolve('systemjs/dist/system.src.js'),
        require.resolve('angular2/bundles/angular2-polyfills.js'),
        require.resolve('rxjs/bundles/Rx.js'),
        require.resolve('angular2/bundles/angular2.dev.js'),
        require.resolve('angular2/bundles/router.dev.js'),
        require.resolve('angular2/bundles/http.dev.js')
    ]
};

gulp.task('build.lib', ['clean'], function() {
    return gulp.src(config.lib, { base: config.libBase })
        .pipe(gulp.dest(webroot + 'lib'));
});

gulp.task('build-dev', ['build.lib'], function() {

});
gulp.task('clean', function() {
    return del([webroot + 'lib']);
});

gulp.task('default', ['build-dev']);
You may wonder why I bothered with all this stuff, shouldn’t I have used
CDN instead?
Yes, of course and for sure I’ll do this. However, for now
I chose the harder way to learn a bit more and gain knowledge on how
to setup a project when you cannot use CDN. At this stage,
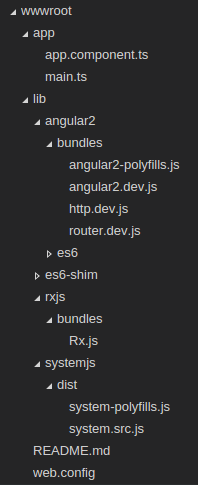
I entered the command gulp build-dev and inside wwwroot a lib folder was created
which contains specified libraries.
After this, my wwwroot structure looked like this:

Now I can combine my Angular 2 with ASP .NET Core. To do this, I need to create a couple of .cshtml files inside the Views folder. Firstly, I must create this folder and then inside the Views folder I created two more folders: Shared and Home. Inside the Shared folder I created a _Layout.cshtml file and inside Home I created Index.cshtml. Inside the Views folder, I had to create another file: _ViewImports.cshtml which gives you the opportunity to provide some default usings for all views. For now I left the _ViewImports.cshtml file empty.
I created another file in Views folder _ViewStart.cshtml. This file when placed into the Views folder will influence all views in this folder hierarchy. I used this file to specify the layout for all views. Although I am going to have only one view. The content of my _ViewStart.cshtml looks like this:
@{
   Layout = "_Layout";
}
My _Layout.cshtml at this stage looked like this:
<!doctype html>
<html lang="">
    <head>
        <meta charset="utf-8" />
        <meta name="viewport" content="width=device-width, initial-scale=1.0" />
        <title>Notifier</title>
        <base href="/" />
    </head>
    <body>
        @RenderBody()
        @RenderSection("scripts", required: false)
    </body>
</html>
You should pay attention to this element <base href="/" />.
It is required by Angular 2 to tell the router how to compose navigation URLs.
You can read more about it
here.
The file Index.cshtml looks like this:
<notifier>
    Loading...
</notifier>
@section scripts {

    <!-- 1. Load libraries -->
    <!-- IE required polyfills, in this exact order -->
     <script src="lib/es6-shim/es6-shim.min.js"></script>
    <script src="lib/systemjs/dist/system-polyfills.js"></script>
    <script src="lib/angular2/es6/dev/src/testing/shims_for_IE.js"></script>
    <script src="lib/angular2/bundles/angular2-polyfills.js"></script>
    <script src="lib/systemjs/dist/system.src.js"></script>
    <script src="lib/rxjs/bundles/Rx.js"></script>
    <script src="lib/angular2/bundles/angular2.dev.js"></script>
    <script src="lib/angular2/bundles/router.dev.js"></script>
    <script src="lib/angular2/bundles/http.dev.js"></script>


    <script>
        System.config({
            packages: {'app': {defaultExtension: 'js'}}
        });
        System.import('./app/main').catch(console.log.bind(console));
    </script>
}
All I did here was to simply include all the files copied to the wwwroot/lib folder and I passed the configuration to System.js, which is a module loader responsible for loading the main file and other application files.
I must of course add HomeController which will return the Index view. It’s located in the Controllers folder and its content are simply this:
using Microsoft.AspNet.Mvc;

namespace Notifier.Web.Controllers
{
    public class HomeController : Controller
    {
        public IActionResult Index()
        {
            return View();
        }
    }
}
After all these steps my project structure looks like this:

I am almost done but before I run the application I have to do a couple of improvements in my server-side setup which I didn’t need before. Firstly, I must setup the default route for my application which will be Home/Index. I did this by adding two lines in method Configure of Startup class so now it looks like this:
  public void Configure(IApplicationBuilder app)
        {
            app.UseIISPlatformHandler();

            app.UseMvc(routes =>{
                routes.MapRoute(name:"default", template: "{controller=Home}/{action=Index}/{id?}");
                routes.MapRoute("spa-fallback","{*anything}",new{controller ="Home", action="Index"} );
            });
        }
This “spa-fallback” route is in case of 404 requests.
It isn’t a perfect solution. I’ll show why and how to do it better in one of my future posts.
At this moment, you can run the application by issuing in terminal
dnx web and you’ll see…an empty page…do you know why?
Because at this moment my application does not serve static files.
You must add another middleware to allow the application to do this.
What’s more, you must even add another Nuget package which is called:
Microsoft.AspNet.StaticFiles. I inserted this dependency in project.json
and then instead of typing, I clicked the Restore button in Visual Studio Code.
After this I used this middleware by typing this line app.UseStaticFiles();
in Configure method, so now it looks like this:
public void Configure(IApplicationBuilder app)
        {
            app.UseIISPlatformHandler();

            app.UseStaticFiles();

            app.UseMvc(routes =>{
                routes.MapRoute(name:"default", template: "{controller=Home}/{action=Index}/{id?}");
                routes.MapRoute("spa-fallback","{*anything}",new{controller ="Home", action="Index"} );
            });
        }
Remember, the order of middlewares is imported if you put this line: app.UseStaticFiles(); after UseMvc middleware your static files still won’t be served.
Running the application now wouldn’t show anything fancy but only errors in the browser’s console,
I must compile TypeScript files. To do this I entered npm run tsc and now .js
files are created and this tool is watching for any changes and recompiles files
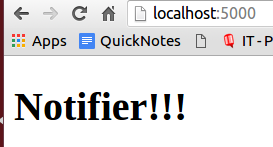
almost immediately when these changes happen. After this, I expected something more
attractive and I was right. This is what I got:

If you would like to repeat my steps, for sure you will encounter some errors and you won’t see them until you add another package called: Microsoft.AspNet.Diagnostics and in Configure method you use middleware UseDeveloperExceptionPage. After this, when an error happens you’ll see a very nice error page. You should add this as the first middleware and remember about dnx restore.
I haven’t finished my set-up yet but I think that this post is already long enough. In my next few posts, I will talk about how I added styling to my application and how I improved this set-up a bit.
Related posts:
- Enrolling in "Daj się poznać"
- "Daj się poznać" - Project details"
- I'm holding a Project Rider EAP
- Installing ASP .NET Core 1 on Ubuntu 14.04
- My first ASP NET Core 1.0 web application
- Project setup - server-side
- Project setup - client-side
- Adding styling to my application
- Angular 2 Confirm Dialog Component
- Before going into production
- Publishing to Azure
- Setting up the Web client for Google Identity Platform
- oidc-token-manager library with Google Identity Platform - Part 1
- oidc-token-manager library with Google Identity Platform - Part 2
- Accessing API with token from Google Identity Provider
- How portable is ASP .NET Core 1.0?
- When dotPeek can save your live
- Reading code as if it were a book
- ASP .NET Core Configuration
- Getting started with IdentityServer4
- IdentityServer4 - accessing API
- Dealing with secrets in ASP .NET Core
- Google Identity Provider with IdentityServer4
- Upgrading to Angular2 RC1
- Experimenting with Angular2 CLI
- Migrating to ASP .NET Core RC2
- Epilogue: Daj się poznać series

Comments
comments powered by Disqus